
The key to reliable Starlink in an RV isn’t finding a mythical, perfectly clear campsite; it’s building a resilient connectivity system that anticipates and overcomes obstructions.
- Even a single tree branch can cause constant disconnections because of how Starlink’s phased-array technology tracks fast-moving satellites.
- Solving this involves a system of trade-offs: choosing the right mount for height, converting to 12V DC power to conserve energy, and having a cellular failover for 100% uptime.
Recommendation: Stop hunting for the perfect spot and start investing in a resilient setup. Begin by choosing a portable pole mount and a basic cellular failover router.
For the modern RVer or van lifer, the dream is clear: work from anywhere, surrounded by the stunning beauty of nature. The reality, however, often sounds like a frozen video call and the dreaded words, “Can you hear me now?” Starlink promised to be the ultimate solution, bridging the gap between wilderness and workplace. Yet, as many nomads have discovered, the very trees we seek for shade and serenity are the greatest enemy of this advanced satellite technology. The frustration of setting up in a beautiful national park only to have your connection drop every few minutes is a shared pain point in the community.
Most advice on the topic is painfully obvious: “find a clear view of the sky” or “use the Starlink app’s obstruction checker.” While true, this is hardly a strategy for those who don’t want to be confined to desert landscapes or Walmart parking lots. The problem runs deeper than simply pointing a dish at the sky. It involves understanding the physics of a phased-array antenna, the significant power draw on a limited battery bank, and the practicalities of deploying and stowing gear on the road.
But what if the goal wasn’t to avoid obstructions entirely, but to build a system so resilient it could handle them? This guide moves beyond the basics. We’ll explore the real-world trade-offs between different setups, focusing on a strategic approach to connectivity. It’s not about finding one magic-bullet solution, but about mastering a complete system of hardware, power management, and backup plans. This is how you achieve true digital freedom, turning your RV into a reliable office, no matter how dense the forest.
This comprehensive guide will walk you through every critical component of a robust mobile Starlink setup. You will learn not just what to do, but why, empowering you to make the best decisions for your nomadic lifestyle. From mounting and power to cross-border travel and creating a truly unbreakable connection, we have you covered.
Summary: The Nomadic Connectivity Expert’s Guide to Starlink
- Why a Single Tree Branch Can Drop Your Zoom Call Every 3 Minutes?
- Tripod or Pole Mount: Which Setup Is Faster to Deploy for Weekend Campers?
- How to Convert Starlink to 12V DC to Save 20% Energy Boondocking?
- The Location Mistake That Gets Your Service Paused When Crossing Borders
- How to Pack Your Dish Safely to Prevent Motor Failure on Rough Roads?
- Why Working Directly on a Laptop Screen Causes Neck Pain Within 3 Weeks?
- How to Run a Satellite Terminal Without Draining Your Boat’s House Battery?
- How to Set Up a Failover Internet Connection for Your Home Office?
Why a Single Tree Branch Can Drop Your Zoom Call Every 3 Minutes?
To understand why Starlink is so sensitive to obstructions, you must first understand that it’s not a traditional satellite dish. It doesn’t just point at a single, stationary satellite in the sky. Instead, it uses a sophisticated phased-array antenna to digitally steer beams and track thousands of low-earth orbit (LEO) satellites moving at over 17,000 mph. The dish is constantly handing off the connection from one satellite that is setting to another that is rising. This happens every few minutes.
An obstruction isn’t just a blind spot; it’s a hole in this complex celestial ballet. When a satellite passes behind a tree branch, even for a second, the connection is severed. The system then has to wait for the next available satellite to come into view. For passive activities like web browsing or streaming a movie (which uses buffering), these micro-outages might go unnoticed. However, for real-time applications like a Zoom call or online gaming, the effect is catastrophic. There is zero tolerance.
This explains the experience of many full-time RVers. One software developer reported that even with his dish on a 20-foot pole, a single adjacent tree caused his connection to drop every 30 to 40 seconds. This made video calls completely impossible, forcing him to rely on a 5G hotspot. The key takeaway is that different applications have vastly different tolerances:
- Email/Web Browsing: Can tolerate minor obstructions with minimal impact.
- Video Streaming (Netflix, YouTube): Buffering can handle brief outages, but quality may drop.
- Video Calls (Zoom, Teams): Require a perfectly clear view. Even 1% obstruction will cause frequent drops.
- Online Gaming: Any obstruction is fatal to the experience.
Therefore, the first step in your strategy is to accept this physical limitation. Your goal is not to “mostly” clear the trees, but to achieve a 100% obstruction-free view of the sky for any mission-critical work. This reality directly influences your choice of mounting hardware.
Tripod or Pole Mount: Which Setup Is Faster to Deploy for Weekend Campers?
Once you accept the need for a clear sky view, the next question is how to achieve it. For RVers, the choice typically comes down to using a simple tripod on the ground versus a telescoping pole mount to elevate the dish above nearby obstacles. While speed of deployment might seem paramount for a weekend camper, the real decider is the trade-off between setup time and connection reliability.
A standard tripod is fast to unpack but severely limits your placement options. You are at the mercy of ground-level obstructions and need a relatively flat, stable spot. A pole mount, while taking longer to assemble, offers far greater flexibility. It can be attached to your RV’s ladder or a hitch mount, allowing you to raise the dish 20 feet or more, clearing campground trees, your own RV, and other potential signal blockers. The choice depends entirely on your camping style and connectivity needs.
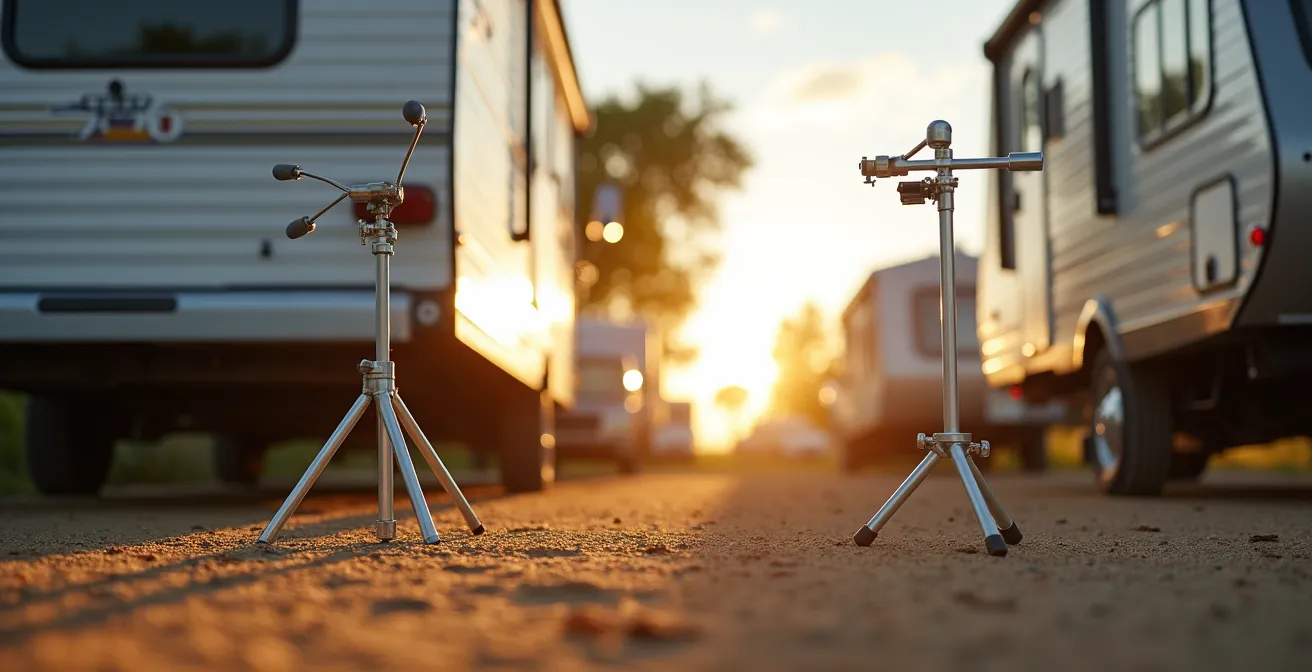
As the comparison shows, the pole mount provides height at the cost of time. For a casual user who can choose an open campsite, the tripod is sufficient. For a remote worker who must get online regardless of the site, the pole mount is non-negotiable. A detailed analysis reveals the time commitment for each option.
| Setup Phase | Tripod Mount | Pole Mount |
|---|---|---|
| Unpacking | 2 minutes | 3 minutes |
| Assembly | 3 minutes | 8 minutes |
| Finding suitable spot | 5-10 minutes (needs level ground) | 3-5 minutes (flexible placement) |
| Securing/Staking | 2 minutes (3 stakes) | 5 minutes (guy wires) |
| Aiming adjustment | 1 minute | 2 minutes |
| Teardown | 5 minutes | 10 minutes |
| Total Time | 18-23 minutes | 31-33 minutes |
However, some full-timers opt for a “zero-setup” solution by permanently mounting the dish to their rig, often using a flag pole holder. Combined with pre-run cables, this can reduce deployment time to under a minute. This is the pinnacle of convenience but requires a significant upfront installation and commitment.
How to Convert Starlink to 12V DC to Save 20% Energy Boondocking?
Getting your Starlink dish above the trees is only half the battle. The next major challenge for boondockers is power. The standard Starlink kit is designed to run on 120V AC power, meaning you have to run it through an inverter. This process is inherently inefficient, converting your RV’s 12V DC battery power up to 120V AC, only for the Starlink router to convert it back down to a lower DC voltage. Each conversion wastes precious energy as heat.
For RVers relying on a finite battery bank, this waste can be the difference between running your internet all day or running out of power by dinner. The solution is a 12V DC conversion. This involves modifying the Starlink cable and using a DC power supply to run the system directly from your RV’s batteries, bypassing the inverter entirely. While this voids the warranty, the energy savings are dramatic. Real-world, field-tested data shows 40-60% power savings have been achieved by RVers after a year of use with a 12V conversion. This can effectively double the runtime of your Starlink on the same battery charge.
However, this modification is not for everyone. It requires a certain level of technical skill and a willingness to risk your equipment’s warranty. Before you start cutting cables, you should carefully consider if the conversion is right for you. This decision tree can help:
- Assess your power budget: Starlink can use between 320 and 960 Watt-hours per day. If your battery bank is small, the savings are more critical.
- Evaluate your technical skill: Are you comfortable with basic wiring, crimping Ethernet connectors, and following a diagram? If not, pre-made kits are available.
- Consider the warranty risk: Is the potential 20-40% power saving worth voiding your Starlink warranty? For full-time boondockers, the answer is often yes.
- Check your battery capacity: You’ll need a robust battery bank to support Starlink, typically a minimum of 200Ah of lithium or 400Ah of AGM.
- Analyze your usage pattern: If you spend more than 50% of your time off-grid, the conversion provides significant value. For occasional weekend trips, it may be overkill.
Ultimately, a 12V conversion is a core component of a truly efficient boondocking connectivity setup. It addresses the energy deficit created by the power-hungry dish and ensures your internet doesn’t become an unsustainable drain on your resources.
The Location Mistake That Gets Your Service Paused When Crossing Borders
Physical obstructions like trees are not the only barriers to nomadic connectivity. A far more frustrating obstacle can be the invisible lines on a map. Starlink’s service plans are tied to specific geographic regions, and misunderstanding these rules can lead to your service being abruptly paused the moment you cross a border.
The standard “Mobile-Regional” plan (formerly “Starlink for RVs”) is designed for use within your home continent. For example, if your service is registered in the United States, you can travel freely throughout the U.S., Canada, and Mexico. However, the moment you drive from the U.S. into Mexico, your service will pause. To restore it, you must upgrade to the more expensive “Mobile-Global” plan. This is a common and costly surprise for many travelers.
Furthermore, there’s the often-misunderstood “two-month rule.” You are permitted to use your Mobile-Regional plan outside your registered home country for up to two consecutive months. After this period, Starlink will automatically pause your service until you either return to your home country or change your service address, which can have its own tax implications. Attempting to game the system by frequently changing your address can lead to your account being flagged.
To avoid these digital roadblocks, a pre-departure checklist is essential for any international RVer:
- Verify Plan Type: Double-check in the Starlink app if you have Mobile-Regional or Mobile-Global.
- Check Coverage Maps: Before you go, confirm that Starlink offers service in your destination country.
- Budget for Global: If you’re crossing continental boundaries or staying abroad longer than two months, budget for the higher cost of the Mobile-Global plan.
- Enable Roaming Early: If your plan allows it, enable roaming features at least 48 hours before departure to ensure a smooth transition.
- Download Offline Content: Always have offline maps and entertainment downloaded as a backup in case your service is unexpectedly paused at the border.
Navigating these service rules is just as important as navigating the roads. A little planning prevents the shock of losing your connection when you may need it most.
How to Pack Your Dish Safely to Prevent Motor Failure on Rough Roads?
Your Starlink dish is a sophisticated piece of equipment, but it’s also a fragile one. The internal motors that automatically orient the dish are particularly vulnerable to damage from the constant vibrations and jolts of road travel, especially on the unpaved access roads common in national parks. Improperly stowing your dish can lead to gear wear from micro-vibrations, resulting in motor failure or extended satellite acquisition times upon arrival.
The bulky, awkward shape of the dish makes storage a challenge. While the original box offers some protection, it is not durable enough for long-term travel. Many RVers report that after traversing rough roads, their dish requires a lengthy 15-minute recalibration cycle. To prevent this and protect your investment, a secure storage solution is not a luxury—it’s a necessity.
There are several options, ranging from DIY solutions to expensive commercial cases, each with a different balance of cost, protection, and convenience. A permanent, flat-mounted dish on the roof eliminates this issue entirely by removing the motors from the equation, but this is the most expensive and installation-intensive option.

For portable setups, a hard case with custom-cut foam provides the best protection. The foam creates a perfect cocoon, preventing any movement and absorbing vibrations. This ensures the delicate motor gears are not subjected to constant rattling. Here is a comparison of the most common storage solutions:
| Solution Type | Cost | Protection Level | Setup Time |
|---|---|---|---|
| Apache 4800 Case + Kaizen Foam (DIY) | $65-80 | Excellent – Zero movement | 2 hours initial cutting |
| Starlink Official Travel Case | $250 | Good – Some movement allowed | Immediate |
| Padded Duffel Bag | $30-50 | Poor – Risk of damage | Immediate |
| Permanent Roof Mount (Flat) | $300+ | Perfect – No motors needed | 4 hours install |
Choosing a robust storage solution is a critical part of a resilient connectivity system. It ensures that your internet hardware actually survives the journey to the remote locations where you need it most.
Why Working Directly on a Laptop Screen Causes Neck Pain Within 3 Weeks?
Once you’ve masterfully solved your connectivity challenges, a new, more insidious problem often emerges: physical pain. The compact nature of an RV means many nomads work from a dinette or couch, hunched over a laptop. This posture, maintained for hours, is a direct path to chronic neck and shoulder pain, a condition often dubbed “tech neck.”
The issue is simple ergonomics. When you look down at a laptop screen, the weight of your head puts significant strain on your cervical spine. The lower you tilt your head, the greater the force. Working this way for just a few weeks can lead to persistent muscle fatigue, headaches, and stiffness. In fact, Mayo Clinic research indicates neck pain is the 4th leading cause of disability, with a high rate of recurrence. For a digital nomad, this isn’t just discomfort; it’s a threat to your livelihood and ability to enjoy your travels.
The solution is to recreate an ergonomic office setup within the confines of your RV. The goal is to bring the screen to eye level and keep your arms in a neutral position. A study on laptop users confirmed that raising the screen height is the most critical factor in reducing neck muscle fatigue. Participants who used a simple stand to elevate their screen showed the lowest levels of strain. This is where a few key accessories become essential tools, not just gadgets.
Your Ergonomic RV Workspace Checklist
- Raise the screen: Use a portable laptop stand (like a Roost or Nexstand) to bring the top of your screen to eye level. This simple change can reduce neck strain by over 50%.
- Separate keyboard and mouse: Add an external, wireless keyboard and mouse. This allows you to keep the screen at the right height while your hands and wrists rest comfortably on the table.
- Consider an external monitor: If you plan to stay in one spot for more than a few days, a lightweight external monitor on a swivel mount provides the best ergonomic experience.
- Fight the glare: Use an anti-glare screen protector or a simple hood when working outside. This prevents you from squinting and hunching forward to see the screen.
- Prioritize movement: Set a timer to get up, stretch, and walk around every 30 minutes. This is even more critical in the confined space of an RV.
Solving your internet problem is only the first step. Creating a sustainable, pain-free mobile workspace is the next, ensuring your nomadic career has longevity.
How to Run a Satellite Terminal Without Draining Your Boat’s House Battery?
Whether on a boat or in an RV, the principle is the same: Starlink is one of the most power-hungry devices in your off-grid setup. Mismanaging its energy consumption is the fastest way to drain your house battery bank, leaving you without lights, refrigeration, or internet. To run a satellite terminal sustainably, you must treat its power as a line item in a carefully managed energy budget.
First, you need to know exactly what you’re dealing with. The power consumption of a Starlink dish isn’t constant; it varies based on its activity. It uses more power when actively searching for satellites or transmitting data, and it has a “snow melt” feature that can draw over 100W, which should always be disabled in an off-grid setting. On average, independent testing reveals a standard Starlink dish consumes about 1kWh per 24 hours. This is roughly equivalent to the entire usable capacity of a 100Ah lithium battery.
To integrate this into your power system without causing an energy deficit, you need a simple calculation. This helps you translate the dish’s consumption into a clear impact on your battery.
- Step 1: Identify your model’s draw. The Gen 2 “Standard Actuated” dish typically uses 50-75 watts in normal operation.
- Step 2: Calculate daily watt-hours (Wh). Multiply the watts by your estimated hours of daily use. For an 8-hour workday at 75W, that’s 600Wh.
- Step 3: Convert to amp-hours (Ah). Divide the watt-hours by your system voltage (typically 12V). 600Wh ÷ 12V = 50Ah.
- Step 4: Add inverter overhead. If you are not using a 12V DC conversion, add at least 20% for inverter inefficiency. Your 50Ah draw is now 60Ah.
This calculation makes it clear: running Starlink for a workday consumes 60Ah from your battery bank. If you have a 100Ah lithium battery, that’s over half of your total available power gone, just for internet. This highlights why a large solar array and a significant battery bank (200Ah lithium or more) are prerequisites for any serious off-grid Starlink user, and why a 12V DC conversion is so highly recommended to eliminate that 20% inverter loss.
Key Takeaways
- Starlink’s sensitivity is due to its phased-array antenna tracking thousands of fast-moving LEO satellites; even tiny obstructions cause drops.
- A pole mount is superior to a tripod for reliability in wooded areas, despite a longer setup time. It’s a necessary trade-off for serious remote work.
- Converting Starlink to 12V DC is the single most effective way to manage its high power consumption, saving up to 40% of your battery’s energy by bypassing the inefficient AC inverter.
How to Set Up a Failover Internet Connection for Your Home Office?
Even with the best pole mount, the most efficient power system, and a perfectly clear sky, Starlink is not infallible. Outages can occur due to network issues, extreme weather, or an unforeseen obstruction. For a digital nomad whose income depends on being online, 100% uptime is not a luxury; it’s a requirement. This is where the ultimate form of connectivity resilience comes into play: an automated failover system.
A failover system uses a special router to manage multiple internet sources simultaneously. In an RV context, this typically means combining your Starlink connection with a cellular (4G/5G) connection. The router constantly monitors the primary connection (Starlink). The moment it detects an outage—even a micro-disconnection caused by a passing bird—it instantly and automatically switches the internet traffic over to the secondary connection (cellular). When the Starlink signal returns, it seamlessly switches back. The user experiences no interruption at all.
Some advanced routers can even perform “bonding,” where they use both Starlink and cellular connections at the same time. This is the gold standard for reliability. As one RVer reported, bonding their connections with a Peplink router allowed them to hold a Zoom call through intermittent tree obstructions. The router automatically sent the stable audio data over the cellular link while using the high-bandwidth Starlink for video whenever it was available, preventing the call from dropping entirely. This level of resilience transforms your RV into a truly professional office. A variety of routers are available to facilitate this.
| Router Model | Price | WAN Inputs | Bonding | Best For |
|---|---|---|---|---|
| Peplink MAX BR1 Mini | $299 | 2 (Starlink + Cell) | Yes – SpeedFusion | Remote workers needing reliability |
| GL.iNet Beryl AX | $89 | 2 (Ethernet + USB) | No – Failover only | Budget-conscious casual users |
| Peplink Balance 20X | $399 | 3+ (Multiple sources) | Yes – Advanced | Full-time content creators |
| Netgear Nighthawk M6 | $799 | 2 (Built-in 5G + Ethernet) | Limited | Integrated cellular solution |
The investment in a failover system depends on your professional needs. For a remote software developer or a teacher, where a single dropped connection can be a major issue, a bonding router from a brand like Peplink is a critical business expense. For a casual user who just wants a backup, a simpler and cheaper failover-only router is sufficient. Building a failover connection is the final piece of the puzzle, completing your system of trade-offs by adding a layer of redundancy that guarantees you are always online.
Frequently Asked Questions on Starlink for RVs
What happens when I drive from the US to Mexico with a Mobile-Regional plan?
Your service will pause immediately upon crossing the border. You must upgrade your plan to Mobile-Global (which has a higher monthly cost) or purchase a local plan in Mexico to resume your internet service.
What does the ‘two-month rule’ mean for international travel?
The Mobile-Regional plan allows you to use your service outside of your home country for a maximum of two consecutive months. After this period, your service will be automatically suspended until you either return to your home country or upgrade to a global plan.
Can I just change my service address to avoid cross-border restrictions?
While technically possible, changing your service address can trigger immediate plan changes, tax implications based on the new location, and is not a reliable long-term solution. Some users have reported that their accounts were flagged by Starlink for frequently changing their service address to circumvent regional rules.